Monday, September 26, 2011

Tube Dress

I am about to go on holidays for 17 days to the Gold Coast in Queensland -yay for me!!! For those of you that are not familiar with Australia the Gold Coast has the most beautiful beaches, skyline, numerous theme parks, great nightlife, fabulous weather and so many fun things to do.  My family and I have been a number of times before and always have such a great time. I am looking forward to a complete break from the normal humdrum of life. Not so much the plane trip that takes over five and a half hours with a stop over in Sydney on the way. We are in Perth on the other side of the country.

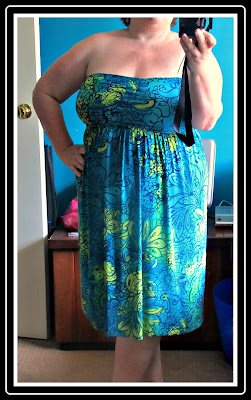
I wanted a simple tube dress to wear down at the pool and for the beach and I managed to find this pretty green knit from Textile traders and its perfect. I didn't have a pattern so just did the best I could.
I doubled the fabric over and just stretched it to fit my top half and sewed a back seam. The skirt was simply one piece with a centre back seam and then I gathered the skirt and attached it to the bodice. I folded the seam allowance from the bodice over the skirt seam allowance and sewed a casing and inserted the elastic. I didn't even worry about hemming it.


I love how comfortable it is and I will get a lot of wear out of it around the hotel. I have another pretty fabric with a cute graduating pattern on it and I am thinking it will sew up nicely in this dress. I could even attach some straps to make it bra friendly to wear out. I am all for comfort especially in our extremely hot summers!!

And for those of you that are interested this is where I am going.

And this is what I will be doing...


Just a shame my body won't look like these whilst lolling downstream on the river at Wet 'n' Wild.... I will be the one struggling to get on my tube lol......


Sunday, September 25, 2011

New Look 6936

I made this dress a few months ago and wore it through winter with boots and a jacket but it is also great for our Spring weather. I wore it yesterday and thought I would do a little post about it.

This is an easy 2 hour knit pattern and even though it took me more than two hours that was mainly because of my fit issues. It is so easy it can definitely be a quick sew and I really liked how the elastic at the waist was done. They have you turn down the bodice seam allowance over the skirt and sew a casing and then thread the elastic through. This was very simple and worked well. I have since used this method in other garments I've made.


I will say this dress is quite low cut and in winter I wore a cami under it, now the weather is warming up I just make sure I have a bra that is lower cut and it is fine.  Pattern adjustments were my usual FBA, a high round back and shoulder adjustments. On my next go round I will have another look at the shoulders as they are falling forward a little bit. I loved the length on this dress -perfect for me!!
I WILL be making this dress again, maybe in a solid, as it is soooo comfortable to wear. I love the fact that I can just throw it on with a pair of sandals and run to the store and feel at least a little bit dressed. Plus being a knit there is no ironing and can be thrown in a suitcase for travelling. A win all round.

Sunday, September 18, 2011

Burda 7567

I saw this pattern some time ago online and liked the cut and style of the pants. The legs didn't look really wide like lots of pants do and they had a nice boot cut leg on them.


So off I go to Spotlight to get the pattern but I didn't write down the pattern number. No problem I thought as I knew exactly what they looked like and I'll just look through the pattern book when I get there. To my shock I find that the pattern is NOT in the book. I thought I must be going mad!! So off I toddle home to look online again and then back to the store. Yay, they had the pattern in the cabinet so I was happy. I found out later that this pattern was accidentally left out of the pattern book  by Burda.

I wanted some cargo type pants for my holiday so I sewed view c, however, left off the pockets. I just wanted them plain and simple. The fabric is a linen/ poly blend of some kind.

After quite a few adjustments this is what I ended up with. They are very very comfortable but there are a lot of issues with the look of them. This certainly isn't a pattern issue but my own body shape.


These are a plus size pattern, however, as a plus size girl we all know we all have our extra bits in different places. For me it's my stomach. My backside is VERY flat and low and I think all my butt has gone into my stomach -HA!!!! I also have hyper extended joints due to a connective tissue disorder so fit issues are a double whammy for me. My calves super extend and a lot of the pants get caught up here. I also have a very tilted waist and one hip higher than the other so this makes for a lot of alterations.

The alterations on this pair were:
  • added  a 2cm  wedge at high hip to cover my extra fluff here
  • a vertical tuck down the whole back leg
  • added extra height at the CB waist
  • a flat butt adjustment and scooped out quite a bit
  • Shortened them above the knee
Now after sewing them up there are still lots of fit issues. Firstly, there are wrinkles on the back pointing towards my knees and also the pants are hitting my outer leg all the way down and I then have a lot of space at the inner leg. The pants are not balanced at all on my legs!!!
 After doing some research I found a blog post by Debbie Cook of Stitches and Seams that talks about these wrinkles Here. If you are a very rare person who doesn't know about Debbie's blog then do yourself a favour and get over there quick as she has some amazing tutorials and tips and sews some fabulous garments.
Anyway I digress...... I think this alteration ALA the Minnott method might just do the trick to centre the pant legs and also to get rid of some of the wrinkles in the back.  I need the legs to be shifted inwards as this is how my body is and all my body collapses inwards due to the EDS.
I don't have the time right now to experiment with this as I have vacation sewing to get done but once I am back I will be giving this a go. I did, however, take five minutes to compare a self drafted pattern to this Burda pattern. The self drafted was a copy of a pair of yoga pants I had bought at the store and had a great fit and I have sewn them up many times. When I laid one pattern on top of the other I could see that the self drafted pattern legs were in fact moved across towards the inseam quite a lot.
Secondly, I need to raise the centre front a cm or two so they sit on my waist better and thirdly I think I will try added more width to the back leg below the knee and see if that stops them getting caught up on my calves.
I don't think I will ever have the perfect fit pants what with having extra fluff everywhere and hyper mobile joints but I want to get the best I can for me. Firstly, comfort and then a decent fit.
Saturday, September 17, 2011

New Look 6895

I was wanting a cool summer casual top to take on my holiday in a fortnights time so I dug out this New Look pattern and some voile from my stash. I love the colours purple and orange together!!


I completed view D that the model is wearing which has a pretty flounce across the top to add a little bit of interest. Now let me say top runs REALLY big. Usually I need to do a very substantial FBA and on this pattern I didn't do one at all. After it was sewn I realized I could have done a very small FBA and the fit would have been a little better, however, it is very comfortable and not pulling anywhere. I usually start with an 18 in the shoulders but on this I got away with a 14.


Sorry the photo isn't so good my lighting wasn't so great today and I tried to lighten the picture up.
On this pattern as with most I needed to take a tuck on the neckline as it wants to gape. Prior to putting on the binding it was sitting flat against my chest but after sewing on the binding it gaped all of a sudden. I am wondering if I stretched out the neckline when sewing the binding on. I purchased a bias stabalizing product yesterday from Spotlight (which was $14.95- YIKES) which I will try on my next garment. I am hoping to try sewing this up in a knit soon.
I made my usual shoulder adjustments on this pattern. I have very hyper extended shoulders so I always need to add extra on the front and take some off the back.

This is a nice basic pattern and very easy to sew up. I am sure I will be sewing this again and again in the future.

Saturday, September 3, 2011

Sorbetto Complete

The Sorbetto top is complete and I really like it. There are a few tweaks I need to make for the next time round.  Firstly, I will dart out the little bit of extra fabric at the armhole as there is still some gaping here. Secondly, my right shoulder is vastly more sloping than my left which has caused the top to not fit as nicely at the neckline on this side. I did do a sloping shoulder adjustment on this side but obviously it needs to be larger!!


 I think this is a basic pattern that can be a  great wardrobe builder and can be dressed up or down.


This is how I wore it today with some self drafted stretch pants and a Kwik Sew jacket. It was very comfortable and held up well for the day.